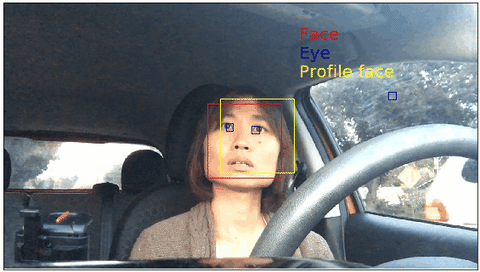
The above gif shows the object detection results from the Haar cascades implemented in OpenCV.
In ths previous blog post Driver's facial keypoint detection, I used public dataset CVC11 to train a facial keypoint detection model. The crucial step in the modeling procedure was to trim image using the face's bounding box. In practice, you might not have access to nice bounding box. In such cases, pre-trained facial detection classifier such as Haar cascade can be useful.
Import necessary libraries
import os
import cv2
import time
import numpy as np
from collections import Counter
Import images
These images are extracted from iphone 6s video. I converted the video into sequence of images with 3FPS frequency. See Extract series of jpgs files from iPhone 6S video to learn how I did it. I will only use the middle 300 images.
dir_jpgs = "IMG_7367/"
jpg_nms = np.sort(os.listdir(dir_jpgs))[1000:1300]
from keras.preprocessing.image import img_to_array, load_img

imgs = []
count = 0
for jpg in jpg_nms:
    if count % 200 == 0:
        print(count)
    try:
        img = img_to_array(load_img(dir_jpgs  + jpg))
    except:
        img = []
        pass
    imgs.append(img)
    count += 1
Haar cascades
OpenCV provides us with pre-trained classifiers that are ready to be used for face detection.
The Haar Classifier is a machine learning based approach, an algorithm created by Paul Viola and Michael Jones; which (as mentioned before) are trained from many many positive images (with faces) and negatives images (without faces).
Some references on Haar cascades
- FACE DETECTION USING OPENCV AND PYTHON: A BEGINNER’S GUIDE
- OpenCV: Face Detection using Haar Cascades
- Youtube tutorial: Haar Cascade Object Detection Face & Eye - OpenCV with Python for Image and Video Analysis 16
To use the pre-trined Haar Classifiers, we need to import the classifiers. I clone the opencv repository from Github to get the pretrained cascades. You can see the cloned xmls in the following cells. You see that there are not only face classifiers but also other classifiers e.g. eye or fullbody.
ls opencv/data/haarcascades/
Create a cascade classifier method that dtermine the bounding box for face.
Notice that the cascade classifier requires to parameters:
- scaleFactor
- minNeighbors
I found that these parameters change the face detection performance a lot. So let's decide which values to use for face classifier by cross validation.
The choice of parameters are described in various places. For example:
haar_face_cascade = cv2.CascadeClassifier('opencv/data/haarcascades/haarcascade_frontalface_alt.xml')

haar_eye_cascade = cv2.CascadeClassifier('opencv/data/haarcascades/haarcascade_eye.xml')

haar_profile_cascade = cv2.CascadeClassifier('opencv/data/haarcascades/haarcascade_profileface.xml')


def get_bounding_box(img,cascade,scaleFactor=None,minNeighbors=None,printing=False):
    ## process images in gray scales,
    ## because we don't need color information to decide if a picture has a face or not
    gray_img = cv2.cvtColor(img, cv2.COLOR_BGR2GRAY)
    gray_img = np.array(gray_img, dtype='uint8')
    faces = cascade.detectMultiScale(gray_img,
                                     scaleFactor=scaleFactor,## 1.1
                                               minNeighbors=int(minNeighbors));

    if printing:
        print('Faces found: ', len(faces))

    return(faces)
Cross validation to decide scaleFactor and minNeighbors
We will use subset of the 100 images to decide which parameter combination to use. I will use slicing factor of 10 and select 0, 10, 20,...,1000th images for cross validation. The slicing factor is > 1 so that relatively desimilar images are selected. As our data does not have true bounding box to assess the cascade classifier's performance, I will evaluate the classifier's performance by proportion of images where the classifier find one face. Ideally, we should get 1 face per frame.
## extract 100 images
Nsample = 50
myslice  = 10
img_subset = imgs[0:Nsample*myslice:myslice]

minNeighbors = [2,5,10]
scaleFactors = [1.05,1.1,1.5]

Nallfaces, neigh, scaleF, times = [], [], [], []
for minNeighbor in minNeighbors:
    for scaleFactor in scaleFactors:
        start = time.time()
        faces = []
        for img in img_subset:
            fs = get_bounding_box(img,
                                  haar_face_cascade,
                                 scaleFactor,
                                 minNeighbor)
            faces.append(len(fs))
        end = time.time()

        Nallfaces.append(faces)
        neigh.append(minNeighbor)
        scaleF.append(scaleFactor)
        times.append(end - start)
The cross validation results
import matplotlib.pyplot as plt
count = 1
best_prop1 = 0
fig = plt.figure(figsize=(20,10))
for k in range(len(minNeighbors)*len(scaleFactors)):
    allfaces = np.array(Nallfaces[k])
    prop1 = 100*np.mean(allfaces==1)
    nei,sF = neigh[k],scaleF[k]
    if prop1 >= best_prop1:
        best_prop1 = prop1
        best_para = (nei,sF)

    fig.subplots_adjust(hspace = 0.52)
    ax = fig.add_subplot(len(minNeighbors),
                         len(scaleFactors),
                         count)

    ax.set_ylim(0,50)
    ax.set_xlim(0,3)
    ax.set_xticks([0,1,2,3])
    ax.hist(allfaces,bins=[0,1,2,3])
    ax.set_title("minNeighbor={}, scaleFactor={}\n%(1face)={:3.0f}% ({:5.2f}MIN)".format(
                 nei,sF,prop1,times[k]/60))
    count += 1
plt.show()

The best parameter combination in terms of the proportion of the images detected with one face was:
#best_para = (10,1.05)
print("minNeighbor={}, scaleFactor={}".format(*best_para))
def plot_rectangle(faces,ax,color="red"):
    for face in faces:
         ax.add_patch(
                patches.Rectangle(
                        face[:2],   # (x,y)
                        face[2],          # width
                        face[3],         # height
                        fill=False,
                        color=color
                    )
                )
def plot_objects(img,objecs,object_names,ax):
        colors = ["red","blue","yellow"]
        ax.imshow(img/255.0)
        count = 100
        for obj, nm, color in zip(objecs,object_names,colors):
            plot_rectangle(obj,ax,color=color)
            ax.text(800,count,nm,color=color,fontsize=20)
            count += 50
Create directories to save each image as .png
dir_image = "drive_image/"
try:
    os.mkdir(dir_image)
    print("folder is created.")
except:
    pass
For each frame, detect all the objects of intrest, plot the bounding box around it, and then save it as an png image.
import matplotlib.patches as patches

## name of all the classifiers
obj_nms = ["Face","Eye","Profile face"]
## all the classifiers
objects = [haar_face_cascade,haar_eye_cascade,haar_profile_cascade]
count = 0
y_pred = None
data = []

for myid, img in enumerate(imgs):
    objs = []
    for haar in objects:
        objs.append(get_bounding_box(img,haar,
                                   best_para[0],
                                   best_para[1]))


    fig = plt.figure(figsize=(10,10))
    ax = fig.add_subplot(1,1,1)
    ax.set_xticks([])
    ax.set_yticks([])
    plot_objects(img,objs,obj_nms,ax)
    plt.savefig(dir_image + "/frame{:05.0f}.png".format(myid),
                bbox_inches='tight',pad_inches=0)
    plt.close('all')
Create gif
import imageio
filenames = np.sort(os.listdir(dir_image))
filenames = [ fnm for fnm in filenames if ".png" in fnm]

with imageio.get_writer(dir_image + '/driver.gif', mode='I') as writer:
    for filename in filenames:
        image = imageio.imread(dir_image + filename)
        writer.append_data(image)